
Performing a Salesforce migration isn’t so different from relocating to a new house. You’re packing up and scrambling to fit everything into the right boxes so that nothing gets left behind. Yet, despite your best efforts, something always seems to slip through the cracks, especially if you handle the task on your own.
In an ideal world, the transition would be seamless. Everything would fall into place with little to no adjustments. This is what a successful migration should be like – with all systems working precisely as intended, sparing you from countless checks.
But as anyone who’s ever moved knows, it takes plenty of attention to detail, and sometimes, you need a little outside help to ensure everything pans out. Thankfully, when it comes to migrating your Salesforce data, there are tools and experts available to make the process as painless as possible.
Today, we’ll be looking at tips and best practices you should keep in your back pocket when moving your data. Let’s get right into it!
A Few Key Terms You Should Get Comfortable With
Before you start your Salesforce migration, you need to understand some key concepts and terminology. Here are a few terms you should know:
- Object: Think of objects as the different categories of information in Salesforce, like leads, accounts, or opportunities. They help organize and structure your data, making it easier to manage.
- Record: A record is simply a single entry within an object, containing specific details. For example, a lead record would include things like the lead’s name, email address, and phone number.
- Field: Fields are the individual pieces of information within a record. They capture specific details about the object, such as a lead’s name or email address. Each field holds a particular type of data, like text, numbers, or dates.
- Data Loader: It works for importing and exporting data in Salesforce. It moves large volumes of data between different Salesforce organizations. With the Data Loader, you can transfer all sorts of data like accounts and contacts to custom objects and fields.
- Mapping: Mapping matches up fields so that information flows well from one place to another. By setting up these mappings, you ensure that your data ends up in the right spots, safe and sound.
With the glossary closed, let’s talk about the real deal: your Salesforce migration!
A Word on Why It’s Important to Migrate All of Your Data, the Right Way
Migrating your data to Salesforce ensures that it remains up-to-date, accurate, and consistent. Having all your data centralized makes generating reports and analyzing business performance so much easier. Plus, as your business expands, Salesforce grows with you, offering the necessary tools and features for managing data and processes more efficiently.
Next up, let’s take a look into the steps of a successful Salesforce migration.
Pre-Migration Planning
Before migrating your Salesforce org, it’s crucial to establish a solid pre-migration plan. This helps with a smooth transition and prevents disruptions to your business operations. Here are some key steps you should take during the pre-migration planning phase:
Assess Your Current System
Start by thoroughly assessing your current Salesforce system. Identify any customizations, integrations, or unique features (such as custom objects and fields) that may affect the migration process. During migration, these elements may need special attention as they could potentially disrupt the process by complicating data mapping, requiring additional validation steps, and forcing adjustments.
Also, evaluate your data quality and determine if any cleanup or deduplication is necessary before migrating.

Set Migration Goals
Next, set clear migration goals. Define the data and functionality you want to migrate – for example, lead information or activity history – along with specific timelines or deadlines.
Choose the Right Tools
Choosing the right tools can turn your Salesforce nightmares into dreams. For example, if you’re struggling with syncing your email using Einstein Activity Capture (EAC), consider switching to Match My Email (MME) to manage your email and calendar data without a single click.
Get Your Data Ready
Before making the leap to Salesforce, it’s crucial to prep your data for a smooth migration journey. This involves tidying up your data, aligning it with Salesforce fields, and crafting a solid backup plan. Here’s a rundown of each step:
Tidy Up Your Data
First things first, let’s get your data in top shape. Cleaning up your data ensures its accuracy and completeness. Say goodbye to duplicates, correct any errors, and standardize data formats. Tools like Excel or Google Sheets come in handy for spotting and removing duplicates, while data cleansing software such as Trifacta or Talend can automate the process.
Map Your Data
Next up, let’s map out your data. This step guarantees that all your valuable information finds its rightful place in Salesforce without getting lost in translation.
Start by identifying which Salesforce fields match your existing data. For example, if you have a “Company Name” field in your existing database, you would look for a corresponding field in Salesforce, such as the “Account Name” field. You can easily do this by reviewing your data and pinpointing the most relevant fields.
Then, use Excel or Google Sheets to map your data to the appropriate Salesforce fields.
Craft a Backup Strategy for Salesforce Migration
Last but not least, safeguard your data with a robust backup strategy.
Begin by identifying the data that needs backup, including everything slated for migration to Salesforce and any other critical data you can’t afford to lose.
Then, leverage tools like Salesforce’s Data Loader or other backup software to create backups. Don’t forget to put your strategy to the test to ensure you can restore your data hassle-free if the need arises.
Let’s Migrate!
After the preparation phase, it’s time to roll up your sleeves and execute the migration. This section will guide you through the three main steps involved in executing a Salesforce migration: configuring the Salesforce environment, the data import process, and testing and validation.
Configuring Your Salesforce Environment for Salesforce Environment
It’s essential to lay the foundation by configuring your Salesforce environment. This involves crafting and refining custom fields, objects, and relationships to align with your requirements. Also, make sure to establish all essential users, profiles, and permissions correctly to pave the way for a seamless transition.
Importing Your Data
Before hitting that “import” button, take a moment to validate your data, map fields accurately, and think about employing data cleansing tools to tidy up duplicates and maintain consistency in your data.
Testing and Validation
Time for the final check! Test any integrations with external systems to ensure everything is up to speed. Get your end-users involved in the testing phase to make sure they can trust the new system for their daily tasks.
You can also try out a pilot test with a small group of users before rolling out the migration to the entire organization. Better to be safe than sorry.

Post-Salesforce Migration Steps
The job isn’t done once you’ve transferred all your assets over. It’s time to shift focus to the post-migration phase so that your Salesforce org operates as it should. Here, we’ll explore some essential post-migration steps to keep in mind.
Email Syncing During Salesforce Migration
During migration, the spotlight often shines on transferring core data and functionalities to the new Salesforce instance. Post-migration, attention turns to integrating additional tools and streamlining processes. One critical aspect is syncing your emails to Salesforce.
Truth be told, EAC can feel clunky, leaving users wanting more. For example, some users report difficulties in integration with certain email platforms, leading to frustration and delays in communication logging. This leaves room for improvement in terms of user experience and efficiency, prompting users to seek alternative solutions like Match My Email.
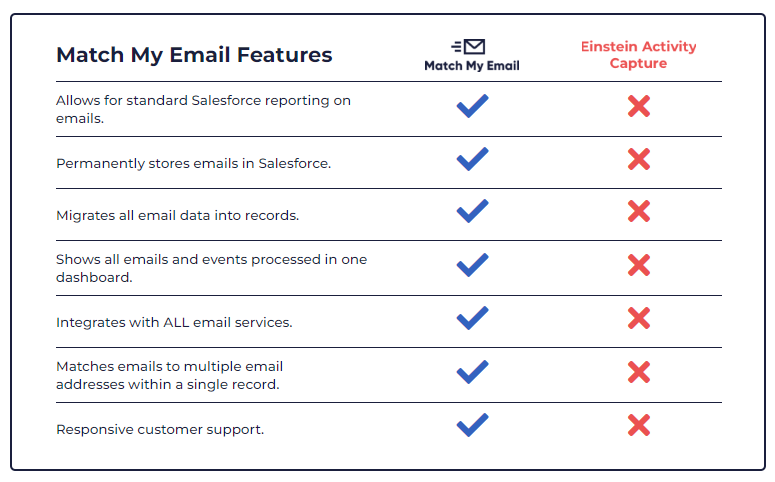
MME lets you reclaim your time by automating email and calendar syncing effortlessly. No more manual syncing – it seamlessly integrates all your critical communications into Salesforce without lifting a finger.
It also syncs Microsoft 365 and Google Workspace calendar events, so you don’t miss any important appointments! Plus, it provides detailed activity reports for valuable insights into post-migration customer interactions and sales performance.

User Training and Support
Post-migration, you should ideally provide comprehensive training and support to make sure users feel at ease with the new system. Craft a training plan containing online modules, in-person sessions, and user guides.
Establish a solid support system like a help desk or dedicated team to address queries or issues without delay.
Monitoring and Reporting
Set up monitoring tools to track system performance, user adoption, and data quality. Create insightful reports to analyze data and pinpoint areas for improvement, keeping your org running without a hitch.
Keep Improving!
Continuous improvement is an ongoing endeavor involving feedback gathering, performance tracking, and data analysis to find opportunities for optimization. Implement changes based on the insights you’ve gleaned, refining your Salesforce org for peak efficiency all the way.
And a Few Answers to Your Other Questions…
Which Salesforce migration tools are recommended for optimal results?
While Salesforce offers a range of migration tools like the Salesforce CLI and the Salesforce Migration Tool, using third-party solutions like Match My Email can improve your experience.
What is the typical timeline for completing a Salesforce org-to-org migration?
The timeline for a Salesforce org-to-org migration varies depending on factors such as data complexity and organization size. Typically, migrations can span from several weeks to several months. It’s crucial to plan and schedule your migration, considering potential downtime or disruptions to business operations.
What are some common challenges faced during Salesforce migration and how to overcome them?
Common challenges during Salesforce migration include data quality issues, compatibility concerns with third-party integrations, and user adoption hurdles.
Overcoming these challenges involves thorough data cleaning and transformation before migration, rigorous testing of integration compatibility, and providing comprehensive training to users. Plus, frequent communication with stakeholders throughout the process helps address any issues right away.
Sync Your Data While Avoiding the EAC Headache
An easy migration starts with getting rid of the roadblocks. Start by storing your email and calendar data in Salesforce – permanently, with the rest of all your records.
Match My Email is compatible with any email client and host, so you can finally get full control of your data without breaking a sweat. Get it now.


