Using our Email Composer
helpH2
Installation of the Match My Email package includes the availability of an email composer. An advantage of using our email composer is a copy of the email is automatically Bcc’d to the User’s email account arriving in the Inbox. Our composer does not place the message in the native Activity Timeline when a User clicks to send off the email. It is the BCC copy that exists in the User’s email account that is imported and matched during a normal processing cycle.
For Users that are uploading as Enhanced Email to the native timeline, using the MME composer reduces the possibility of duplicate emails in the timeline. This is because using the native Salesforce composer will, by default, put a copy in the timeline as soon as the message is sent. Within 20 minutes, MME will potentially bring that same message in again from the User’s email account causing a duplicate. There are other options for reducing this behavior which can be provided by the MME support team.
The MME composer supports use of organization-wide email addresses and templates. One key difference with the MME composer is it allows templates to be used in a reply without overwriting the original thread. The thread is maintained below the template.
Using the Composer
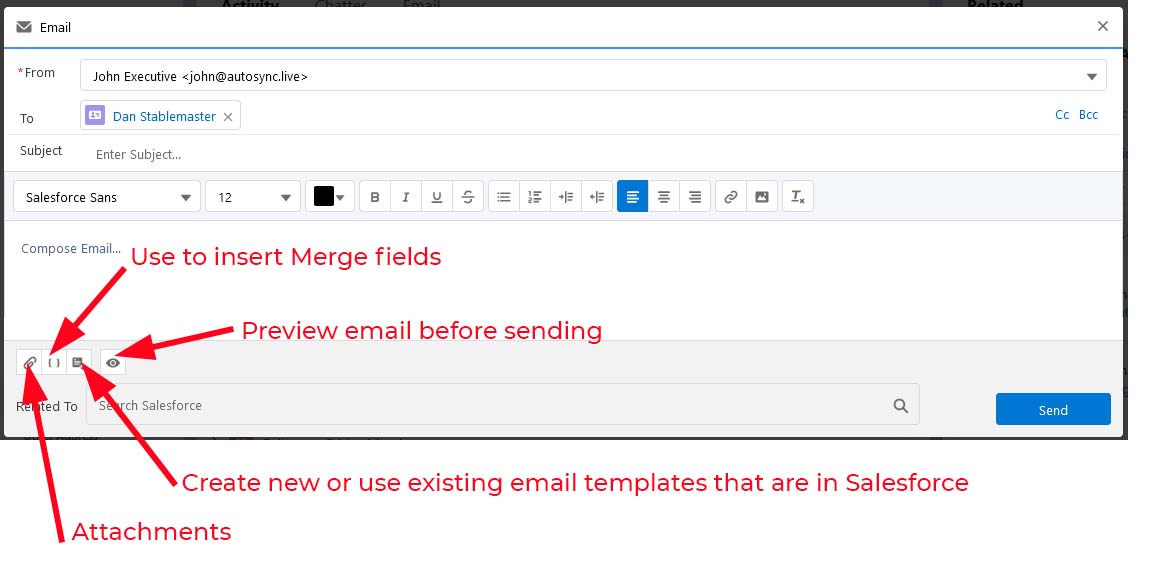
When clicked, the email composer will launch as a pop up window. The From field will automatically fill with the email address of the Salesforce User. If your organization is using Organization-wide email addresses in Salesforce and the user launching the composer has access, there will be a carat to the far left of the From address. Clicking the carat will present the Organization-wide email addresses available to this User for selection.
The to field will automatically fill with the name of the record if the composer is launched from a Lead or Contact record. If the email composer is launched from an Opportunity or Account record, the Related To at the bottom will fill in, but the User will still need to type a few letters to do a lookup for the appropriate Contact. Buttons at bottom left allow you to attach files, insert merge fields, create an email template or use an existing template, as well as Preview the email before sending.
If using our custom object, it is possible to launch the composer to reply or forward. Select a message in the custom object and a floating ribbon appears at the bottom of the screen. Buttons there for Reply, Reply All, and Forward will launch the composer. Fields will be filled in appropriately and the original email will be present in the body, with a cursor awaiting new text above it. As mentioned, templates can be pulled into the area above the thread while preserving the original message below.

Placing the MME Send Email Button
The composer can be launched using the MME Send Email button that is placed on an object’s page layout. For customers that are uploading to the MME custom object, they can also launch the composer by selecting a message and clicking the Reply, Reply All, or Forward buttons.
For most objects, the MME Send Email button can be placed in Page Layouts > Mobile & Lightning actions section. Where it is placed in this section will impact how prominent the button appears. If you have upgraded to Dynamic Actions or want to use the button on Cases, it will appear in a slightly different location and steps to place it are different.
If you have upgraded to Dynamic Actions on your Lightning Record Pages, you can follow the steps indicated in this article.
If you are not using Dynamic Actions, you can follow the placement steps below.
- Navigate to Salesforce Setup > Object Manager > Contact (as an example). In left menu click on Page Layouts. In list, for the layouts you use click the name of layout to Edit.
- At top left, click on Mobile and Lightning Actions. If the Salesforce Mobile and Lightning Experience Actions section below does not already show items it contains, hover over grey area. It will highlight as blue, click the wrench icon to open the section for edits.

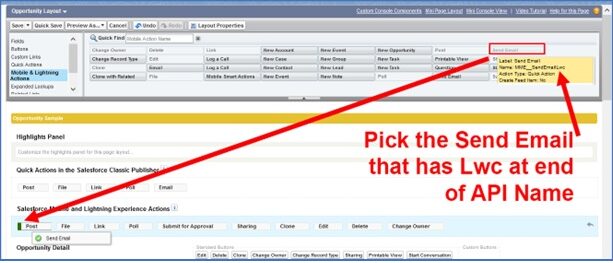
- There may be two actions for Send Email. Hover over each to find the MME custom button named MME__SendEmailLwc. Note, you want to use the button with Lwc at the end of Name. Drag it into the Salesforce Mobile and Lightning Experience Actions section. We recommend placing first, with green indicator appearing as in screenshot below.
- Click on any pre-existing Email, Send Email and Send an Email buttons, one at a time, drag to the top Fields area to remove them from layout. Click Save at top left to save changes.

- Repeat steps for a Lead or objects from which you want to send email.