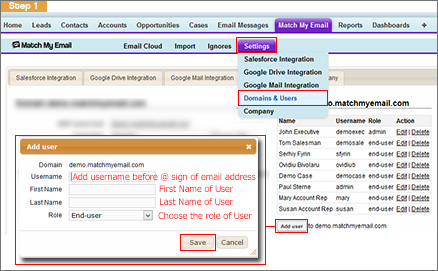
Add Another Match My Email User (Accounts Prior to June 2019)
helpH2
**These instructions are for Match My Email accounts created prior to June 2019 and not using an Global Administrator credential for connection to Microsoft 365.**
How new Users are added to an existing MME account can be determined by the Cloud Admin. The two methods are 1) to enable Add Users Automatically option for domain or 2) require addition of User by Cloud Admin.
Enable Add Users Automatically (set by Cloud Admin)
By enabling Add Users Automatically for the domain, new Users with an email address in that domain can login and get setup quickly, without requiring a step first by Cloud Admin. Since January 2017, this option is enabled by default.
- To enable, a Cloud Admin would login to MME, go to Settings > Domains & Users and for the domain on left check box to enable Add Users Automatically, and Save.
- Once enabled, the New User can follow Setup up Wizard steps below.
Addition of User by Cloud Admin
The MME Cloud Admin adds a User to the Domains & Users tab, thus giving this individual the ability to access and participate in the MME account already established by the Account Cloud Admin.
- Cloud Admin logs in to Match My Email
- In blue menu ribbon, navigate to Settings > Domains & Users
- With domain on the left, to the right click Add User button
- Fill in username with character string in front of the @ symbol in email (ex. mary@acme.com – username would be mary). Please note, for Exchange servers that use active directory login ID or 1 and 1 Exchange servers that use unique ID (eXXXXXXX), if these IDs are used to login to email they should be the ones entered for username.
- Fill in First name and Last name.
- Assign a role. Domain Admins can add other Users and create ignore rules. End users are basic users.
- Click Save.
Setup Wizard for New User
The steps below are summarized with screenshots in our Quick Set up Guide.
- New user navigates to https://www.matchmyemail.com (For Users in Europe, the link is https://eu.matchmyemail.com)
- For username, new User types in email address. For password, new User can use email password. (The button Login with Salesforce will not work since Salesforce credentials are not yet in the account.)
- Once logged in, a wizard will guide the User through steps. *If Gmail is provider and password is not allowing login, click the Login with Google button. User will bounce to Google to login. Click Allow.
Set up Salesforce Integration:
- Click Next, leave choice as Production as click Next again.
- After jump to Salesforce, User will be prompted to login if not already logged in. Verify credential is correct (per screenshot below) and click Allow.
Set up Email account for import:
- Upon return to MME, follow prompts for email. User may only need to input email address and password, or can make a choice of provider.
- If Google is provider, click Next. Jump to Google to login and Allow access.
- If provider is not Google, choose Other can click Next. Enter IMAP server host if prompted, email address and password and click Next.
- For folder selection, MME will automatically pull into Selected Folders the Inbox and folders with Sent in name. Most users leave “Inbox” and “Sent” folders selected for synchronization with Salesforce. You may select additional folders from the Available Folders list, but more than 18 selected folders can reduce efficiency of import. Do not select All Mail, or Junk, Spam, Draft, etc. These additional selections will slow down processing of relevant emails and may result in duplicate copies of Drafts.
- Please allow first import to run and complete.
- Click Next and then click Finish.
Please contact support@matchmyemail.com for additional assistance or questions.

