[vc_row][vc_column width=”2/3″][vc_column_text]The default setting for tabs or NAVIGATION ITEMS in Lightning includes a number of tabs or NAVIGATION ITEMS that our users don’t use. We have custom tabs in Classic or from installed packages that users would like to see and use in Lightning.
A user can personalize their tab setting by following the two-step process outlined below.
Yes, it is a two-step process which is what makes it a bit confusing
Step One — adding and deleting tab or Navigation Item options — can only be done by user with Salesforce Admin privledges !!!
- Go to the Home Page and click the SETUP GEAR ICON >>
- Under PLATFORM TOOLS >> APPS will appear
- Click on APPS and APP MANAGER will appear
- Click APP MANAGER >>
- Within the APP MANGER screen find SALES – Lightning Sales in the List
- On the far right side of the Lightning Sales row is a down button. Click on it and reveal the EDIT option >>
- Click EDIT >>
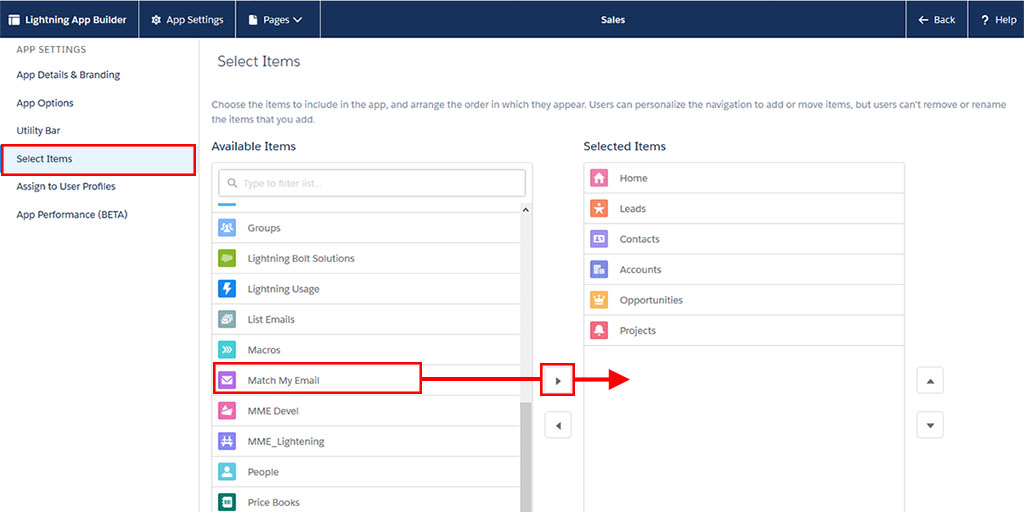
- Under APP SETTING click SELECT ITEMS
- From the AVAILABLE ITEMS list [tabs are called Navigation Items in Lightning] select the tabs that you want to be visible on the top of each page in the uppermost panel – the uppermost panel on each page is called the Navigation Bar
- From the SELECTED ITEMS deselect the tabs that you don’t want to see
- The AVAILABLE ITEMS list will also include any custom tabs created by installed packages like Match My Email. If you want to make the Match My Email tab visible in the NAVIGATION BAR move it from AVAILABLE to SELECTED
- You can also reorder the SELECTED ITEMS by highlighting one and then moving it up or down (left or right on the NAVIGATION BAR) in the SELECTED ITEMS List but this doesn’t do anything unless you are creating a default tab setting for your entire organization. It does not personalize the NAVIGATION BAR so it is not useful for end users>>
- Click SAVE
Now for step two
- Now go to the HOME PAGE
- On the far right of the uppermost panel or the NAVIGTION BAR there is an edit Icon that looks like a pen>>
- Click on the edit icon >>
- This will open the Edit Sales App Navigation Items screen
- You can remove tabs using this screen and reorder them in the NAVIGATION BAR but you can’t add tabs [if you need to add a tab revisit step one above]
- If you want to remove a tab or NAVIGATION ITEM click the X in the item box
- If you want to reorder the tabs, hover over the item name and drag up or down
- There is no save button
- So once you have the tab or items list as you want it and in the order you want just leave the screen and you are done
- Refresh the HOME PAGE to make sure the tabs or NAVIGATION ITEMS that you want are visible and in the order you prefer.
About Match My Email
If you would like to make your Salesforce deployment even better, take a look at how automated email integration can increase productivity and user satisfaction. Match My Email, the leading automated syncing app for Salesforce, fixes the flaws in other email syncing tools and fills in their functionality gaps.
Match My Email syncs to multiple email addresses for the same Contact and/or Lead [MULTIMATCH], eliminates duplicates emails in Salesforce [DEDUPE], is fully customizable so it can sync to custom records [CUSTOM MATCH], can sync by unique attributes like names, words or numbers in Opportunities [PRECISION MATCH] and creates email meta-data that can be used to track email activity by customer or user [TRACKING]. For a Live Demo of the app, use this scheduling tool.[/vc_column_text][/vc_column][vc_column width=”1/3″][vc_widget_sidebar sidebar_id=”sf-widget-area”][/vc_column][/vc_row]


