[vc_row][vc_column width=”2/3″][vc_column_text]
Problem Definition
We are struggling to get users to convert to Lightning. They don’t like the way the information is organized in Lightning by default – too much white space and the most important data, i.e., Activities, are not front and center.
Solution
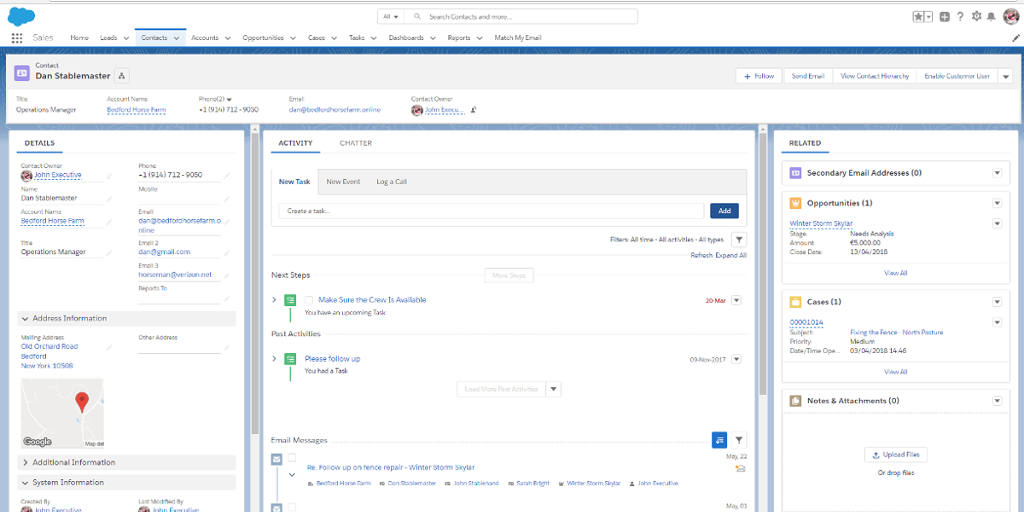
A three-column page layout which has Details on the left, Activities in the middle and Related Lists on the right. This page layout minimizes white space and allocates more space for Activities which are the most important information in the record.
The page layout reformatting process is pretty involved but with a little practice, it makes sense and is actually quite straightforward.
- Open a Contact and click the SETUP GEAR ICON >>
- Click PLATFORM TOOLS – – OBJECTS AND FIELDS >>
- Click OBJECT MANAGER >>
- Select and click on CONTACT >>
- Click LIGHTNING RECORD PAGES >>
- Click the NEW button on the upper right >>
- LIGHTNING APP BUILDER appears >>
- Choose the third option, RECORD PAGE >>
- Click NEXT >>
- Type in LABEL name [for example, 3-Column Contact Layout] >>
- Pick the CONTACT object from the dropdown list >>
- Click NEXT >>
- From the CHOOSE PAGE LAYOUT list, choose CONSOLE: PINNED HEADER >>
- Click FINISH >>
- Drag and drop HIGHLIGHTS from left setup section to the top panel >>
- Drag and drop TABS into the left, middle and right page sections >>
- Click on the left TAB and delete Related from the right configuration panel >>
- Drag and Drop RECORD DETAILS into the left TAB that now only is labeled DETAILS >>
- Click on the middle TAB >>
- Change RELATED in the right configuration panel by clicking on it and opening a dropdown menu to ACTIVITY and click DONE >>
- Drag and drop ACTIVITIES from the left panel into the ACTIVITY tab, you will see it resolve to ACTIVITY TIMELINE with NEXT STEPS and PAST ACTIVITY >>
- [If you are a Match My Email user, drag and drop EMAIL MESSAGES from the Custom – Managed list at the bottom of the scroll down menu onto the ACTIVITY tab below PAST ACTIVITIES when you see the ‘green line’ and release >>].
- Change DETAILS to CHATTER in the right configuration panel by clicking on Details, opening the dropdown menu, finding Chatter, highlighting Chatter and click DONE >>
- Drag and drop CHATTER into the CHATTER tab >>
- Click on the right tab >>
- Delete DETAILS from the right configuration panel by clicking the X >>
- Drag and drop RELATED LISTS from the left panel into the RELATED tab in the right section of the page >>
- Click SAVE in the upper righthand corner of the right setup panel >>
- In the popup menu click ACTIVATE >>
- In the ACTIVIATION page click on ASSIGN AS ORG DEFAULT >>
- Pick an app(s) from the APP picklist – Lightning and Sales — >> click BACK (that is right BACK once you have highlight the app(s)) >>
- Click SAVE in the upper righthand corner again.
You are done!
The video below walks you through the steps.
About Match My Email
If you would like to make your Salesforce deployment even better, take a look at how automated email integration can increase productivity and user satisfaction. Match My Email, the leading automated syncing app for Salesforce, fixes the flaws in other email syncing tools and fills in their functionality gaps.
Match My Email syncs to multiple email addresses for the same Contact and/or Lead [MULTIMATCH], eliminates duplicates emails in Salesforce [DEDUPE], is fully customizable so it can sync to custom records [CUSTOM MATCH], can sync by unique attributes like names, words or numbers in Opportunities [PRECISION MATCH] and creates email meta-data that can be used to track email activity by customer or user [TRACKING]. For a Live Demo of the app, use this scheduling tool.[/vc_column_text][/vc_column][vc_column width=”1/3″][vc_widget_sidebar sidebar_id=”sf-widget-area”][/vc_column][/vc_row]


