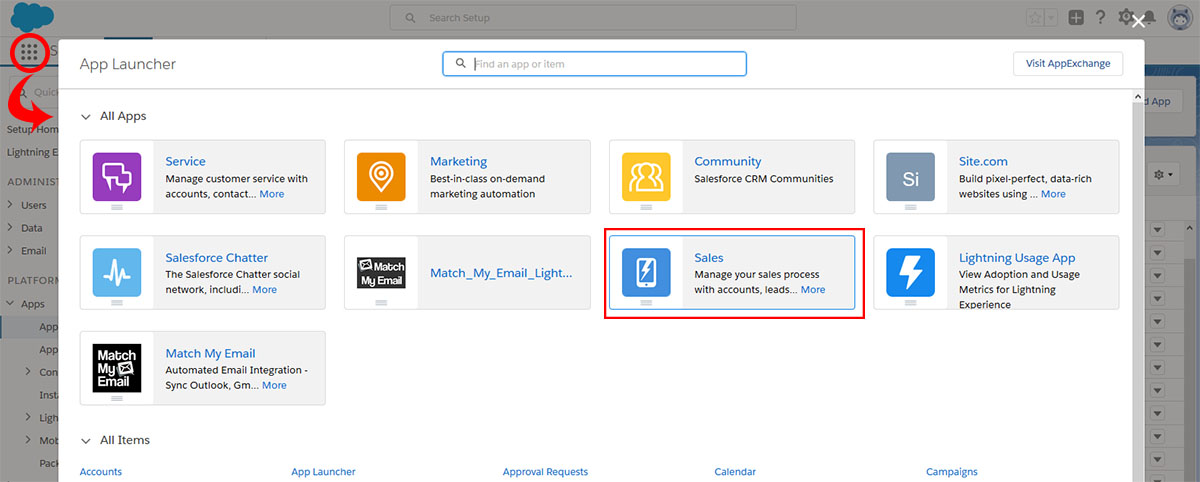
[vc_row][vc_column width=”2/3″][vc_column_text]Navigation in Salesforce.com Lightning Experience can be done using a variety of tools. The most basic is the standard Lightning app options provided with a new organization. At the top left of your home screen is a grid of nine dots called the App Launcher. When clicked, a screen will open to offer options for changing your interface to a standard app, a console, or other options. This article looks at the standard apps.
The Sales or Service apps provide a way for administrators to customize the menu of options presented to a specific User. The screenshot below shows that when this User is logged in, they are using the Service app and the menu items to the right for this app are evident.
If a User wanted to change to the Sales app, they can click the App Launcher and click on Sales. This will change the app being used and may change the menu items in the navigation bar to those customized for a Sales team member, as opposed to a Service team member. If a User logs out, when they log back in to Salesforce.com, the last app used is the one with which they will begin.
A User can also modify the Nav Bar to include the important apps and records to which they would like to have quick access. There are two ways to add items to the Nav Bar – 1) using the All Items option to add a single item or 2) using the Pen Icon to add multiple items.
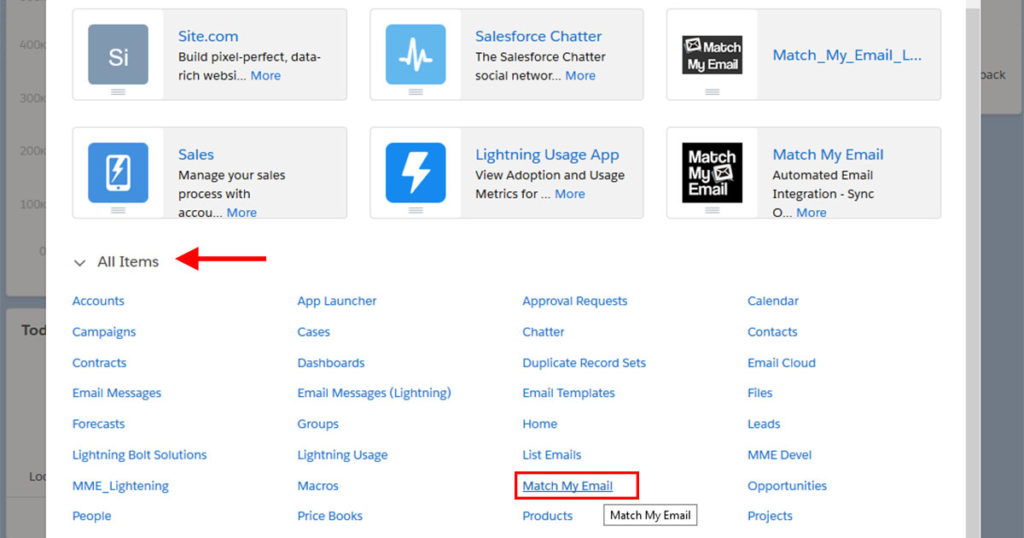
1) As an example, if we were using the Sales app and wanted to add a single app, such as Match My Email, to the Nav Bar, we can click the App Launcher and look below the list of apps to the All Items section. In this section, click on Match My Email.
You will then see that Match My Email is a temporary option in your Nav Bar. If you click the drop down arrow and click the option “Add Match My Email to Nav Bar”, it will be there until you decide to remove it.
2) If you want to add more than one item to the Nav Bar at the same time, you may want to use the pen icon at the far right. Click the pen icon and in the pop up window click the button to Add More Items.
On the left, click All to reveal a long list of options you can add. There may be so many options available that you will want to use the Search box. Below we have typed ‘match’ and that quickly allows us to find Match My Email as the option we wanted. Click the ‘+’ sign to left to select it.
If you want to and another item, you can search again or click X to show you the original list. When the right option is found, click the ‘+’ for that item. In the below screenshot you can see there are two items listed under the Search box, and you can click Add 2 New Items to add these to your Nav Bar. In the final window, you will need to click Save to save the changes.
About Match My Email
If you would like to make your Salesforce deployment even better, take a look at how automated email integration can increase productivity and user satisfaction. Match My Email, the leading automated syncing app for Salesforce, fixes the flaws in other email syncing tools and fills in their functionality gaps.
Match My Email syncs to multiple email addresses for the same Contact and/or Lead [MULTIMATCH], eliminates duplicates emails in Salesforce [DEDUPE], is fully customizable so it can sync to custom records [CUSTOM MATCH], can sync by unique attributes like names, words or numbers in Opportunities [PRECISION MATCH] and creates email meta-data that can be used to track email activity by customer or user [TRACKING]. For a Live Demo of the app, use this scheduling tool.[/vc_column_text][/vc_column][vc_column width=”1/3″][vc_widget_sidebar sidebar_id=”sf-widget-area”][/vc_column][/vc_row]


